Download ArmRestor Instructions
The ArmRestor™ was developed over time to ensure all cars, trucks; SUV’s and other vehicle types can joy the benefits of the product. The ArmRestor fits in all vehicle types, providing an easy attachment between the window and weather stripping
without any obstruction to your vehicle. The materials used for the device are scratch resistant to avoid damage to the window or the interior of your vehicle. We have manufacturer’s grade material to withstand all types of cold & heat resistances, keeping the longevity of your device.
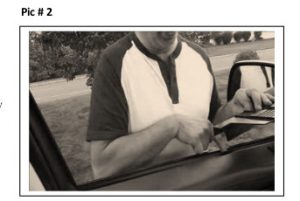
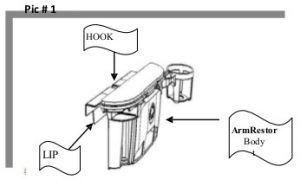
ATTACHMENT : The ArmRestor™ lip (Pic # 1) slips into any area on your door panel between the weather stripping & window
(Pic # 2 & 3).
1) Best method is to remove the hook attachment (Pic #2) from the main unit to ensure there is enough space to fit comfortably over the depth of your door panel’s plane before attaching the ArmRestor Body.
2) The best option of inserting the hook lip (Pic #2) is to have your window rolled down completely, and in some cases, to leave the window slightly visible, and then insert the lip between the window and the weather stripping. Make sure the lip is not inserted over the
glass (Pic # 3), then roll up window to ensure it is properly attached.
3) Final step- (Pic # 3) place the ArmRestor body into the hook. Hook is attached as shown (Pic #4). The hook will snap into place. Press the body of ArmRestor until it is tight against the door panel. The hook will tighten as the ArmRestor body is pressed in. Place ArmRestor where it avoids any intrusion of your door latch or door release knob. 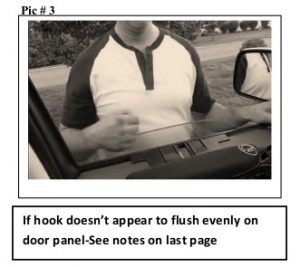

4) Once the hook is attached to the main body(Pic #3), the device will comfortably stay in position. To Adjust the hook according to the depth of your door panel, or remove the unit from your door panel, simply press down on the Release button (Pic # 5) and pull away ArmRestor Body. The device can be used with window open or closed. 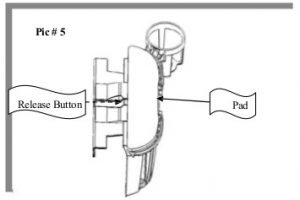
LEVELS OF HEIGHT ADJUSTMENT: The ArmRestor has various levels of Height adjustment for your particular level of comfort, when resting on the door panel. Simply press the Release button (Pic#5) and the ArmRestor Body will incline. Each adjustment allows the Device to position itself to a lower position adjacent to the door panel, lowering the Pad to a comfort position by the end-user. The Unit might feel slightly lose but is designed to be secure. Adjust height to a secure comfort level.
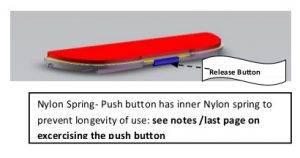
PAD ADJUSTMENT: The ArmRestor Bodycan be fitted along any area of your door panel, avoiding any objects that a door panel may have while still enjoying the comfort of the cushion pad. The cushion pad sits on a base of the Unit that allows to be adjusted. 1) By slightly pressing
and holding in the pad release button located in the center of the pad, the pad will easily slide with slight pressure: the pad will move along the base and lock in various preset intervals by releasing the button. This will allow you to use the cushioned pad when placing the device a distance from you to avoid any objects that your door panel may have. The pad can be removed from the unit base for cleaning purposes. The pad has a slidable capacity area of about 3 inches out from each base end.

THE CUP HOLDER: allows you to move the cup to either side tray located at each end of the device. Simply push down the Push Button located on the arm base of the cup holder, slide out the cup holder from the tray area. To place the cup holder on either side of the unit: simply press down the button feature located on the arm base, and snap the cup holder into the aperture located within thetray area. The cup holder allows swivel action to accommodate the end user comfort by just moving the cup holder in a 270-degree fashion with preset locking positions. The Ergonomically designed cup holder allows for standard Industry cans and Styrofoam cups as well as bottles and your cell phone. The cup holder will tightly hold any drink into position while driving.
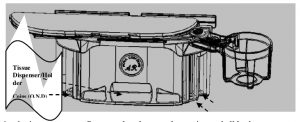
Tissue department: the tissue dispenser holds standard (large) Release Button and compact size Kleenex tissues purchased at any shopping /grocery center. In the back of the device, simply insert the tissues in the Center lip. Pull out one tissue from the front center window to expose for easy dispensing.
Coin Dispenser: holds your quarters, nickels and dimes. Simply insert your coins beneath the puck (disc).
The puck located in each coin chamber attaches to a spring coil to securely hold your coins in place for disbursement. Removing a coin is simple, just place your finger under the mouth (see arrows) and slide out the coin.
Coin Dispenser: holds your quarters, nickels and dimes. Simply insert your coins into the proper chamber from the front: the puck attaches to a spring, securely holding your coins for disbursement. Removing a coin is simple, just place your finger under the mouth opening and slide the coin out.
Questions and Answers:
Q: Does the ArmRestor need any adhesives, screws, or other attaching elements?
A: No, the ArmRestor device was developed and patented to allow the unit to station on your door panel without the use of
these tools or attachment materials. The lip adjustment allows the device to fit securely & comfortable along any door panel.
Q: Will the ArmRestor look or appear to fit smoothly or look right?
A: Yes, the patented features and ergonomic design fits smoothly on the door panel. The adjustable lip will allow the ArmRestor
to press tightly along the door panel for a tight and smooth fit without the lumbered appearance.
Q: Is the ArmRestor permanently positioned on the door panel?
A: NO, it is your choice to leave it there permanently or not. The device is portable and the adjustment mechanisms allow you
to easily remove it, reposition it, or replace it back on your door panel.
Q: Can the ArmRestor Device only be on the driver’s side door panel?
A: No, the device was designed & patented to be used as a reversible Armrest and can be used on any one of your door panels. The cup holder can position on each side of the Device, allowing the cup tray to be reversible. This will allow the Cup tray to always be positioned in the front.
Q: Can you place the Cup holder on the back end of the Device?
A: Yes, the cup holder has two holding locations (chambers), one on each end. It is up to the owner to use it to their best intentions. We recommend having the cup holder rest in the front side for easy access while driving. For passenger use, the cup holder can be in either position.
Q: Will the Lip scratch the window?
A: No, the materials used are scratch resistant. The ergonomically developed Lip avoids the back end from rubbing against your
window.
Q: Can the Pad height adjustment be higher or lower?
A: Yes, the ArmRestor has preset positions on the hook adjustment, allowing you to have the pad raised in a higher position to the
plane of your door panel or raised lower to the plane of your door panel. The unit will incline. Or you can simply raise your seats to adjust for the height of the ArmRestor. Visit our web page for our soon to be released Z hook which allows total height adjustment without the incline appearance.
Q: If lower the Pad height of the device, will the device be loose?
A: Yes and No, lowering the device will seem slightly lose but it was designed to stay on the door panel when in use and when
closing the door. No, when the device is in a higher positioning. It all depends on your pad comfort level.
Q: Will a drink spill while driving?
A: No, the design of the cup holder and unit will withstand road bumps, so it acts as a shock absorber. However, like any cup- holding device, liquid within the cup should not be full to the rim.
Q: Will the drink come out of the cup holder is a slam the door?
A: No, the cup or drink will remain in the door. We recommend that your drink is not full to its rim.
Q: Will the drink come out of the cup holder with the ArmRestor adjusted for height comfort?
A: Possibly, the drink will come out of the cup holder if the unit is adjusted to a lower position. If the unit adjusts in a lower position, the cup holder will slightly be angled. Use your best judgment. ( visit our web page for our soon to be released Z hook allowing for height adjustment capabilities without any unit incline).
Cautions:
- Position the ArmRestor along the door panel to avoid interference with the steering
wheel, so that you have the most comfortable positioning of the Device. The slidable pad allows you to
use the device as close or far from you since the pad feature moves along the base. - Be diligent where you place the device so to avoid objects that may be on your door panel such as a handle to open the door or the doorknob.
- Before closing or slamming your car door, be sure to remove any drinking cup from the cup- holder that does not have a lid cover. This is a precaution so to avoid the cup from potentially spilling out any liquid.
- Be cautious of drinking hot items placed in your cup holder as you may unintentionally hit the cup while driving and may burn your hand or leg. Place the cup holder in the appropriate position.
- Window with Film coating- If your vehicle is tinted with film plastic coating, be cautious as the hook may scratch the film. Tinted windows with no film coating have no caveats.
Nylon Spring Push Button– located within the interior pad, contains a nylon spring. We do not use metal springs. This allows years of continued use and easy replacement if required and to ensure a tightly secured pad while driving. A new Push button may sometimes be rigid or feel very tight when pressing to slide the pad. This is easily resolved. We recommend on some units to first exercise the push button to loosen the Nylon (resilient plastic) by gently pressing and releasing the push button until you are comfortable with the ease of use.
Hook Not Flushing on door panel– some vehicles may appear to prevent the hook from flushing evenly on the door panel. This is easily resolved. This is commonly caused by either U channel blocker that is placed inside the door panel or a secondary inner rubber lining. This is used sometimes to keep window tight enough from rubbing against the rubber lining or for weather prevention.
Place your finger inside the rubber lining to push the second inner lining to one side , while holding the lining to one side, with the other hand, take the lip located on the hook and angle it in between the window and lining. Gently wiggle the lip until it easily slides inside this area. If a U channel is the issue, you can easily feel for it. Normally found in the center of the door panel about an inch beneath the top of the panel. Again with your finger, gently feel for the blocker and press to one side or gently move it while sliding the lip inside the door panel. Again, wiggle it gently until the hook slides into place.

